
Use it in your project
The quick start sets an effect once at BeginPlay. A game changes the controller all the time instead: a trigger that resists while the player holds a tool, a red lightbar when health is low, a rumble on every hit. This page shows the pattern that keeps that simple.
Before you start
- Adaptive Pad is enabled in Edit → Plugins (Installation).
- The controller is connected and the Output Log shows
LogDualSense: DualSense #0 connected (USB)(orBluetooth) when you press Play. - If your project used the Raw Input plugin for the controller, it's disabled (why).
1. Pick where the logic lives
Any Blueprint can call the DS nodes: they don't need a reference to anything, only the Controller Id (0 for the first controller). Where you put them is up to your game; these are the usual choices:
| Where | Good for |
|---|---|
| Player Controller | Effects that belong to the player and survive a respawn: lightbar for the team colour, player LEDs, menus. |
| Character (or the pawn) | Effects tied to what the character is doing: holding a weapon or a tool, driving, swimming. |
| An Actor Component you add to either of them | Keeping all the controller feedback in one reusable place, out of your gameplay graphs. |
| The actor that causes the effect | One-off feedback such as a door that rumbles when it opens, or a pickup that flashes the lightbar. |
A component is a tidy default: create a Blueprint of class Actor Component (for example BPC_PadFeedback), add it to your Player Controller or Character, and give it one custom event per gameplay moment.
2. Read the buttons with Enhanced Input
The controller is a normal Unreal input device, so input needs no DS node at all. Map the gamepad keys in your Input Mapping Context as you would for any gamepad. The PS, Touchpad and Mute buttons, and the touchpad fingers, have their own keys in the DualSense category of the key picker.
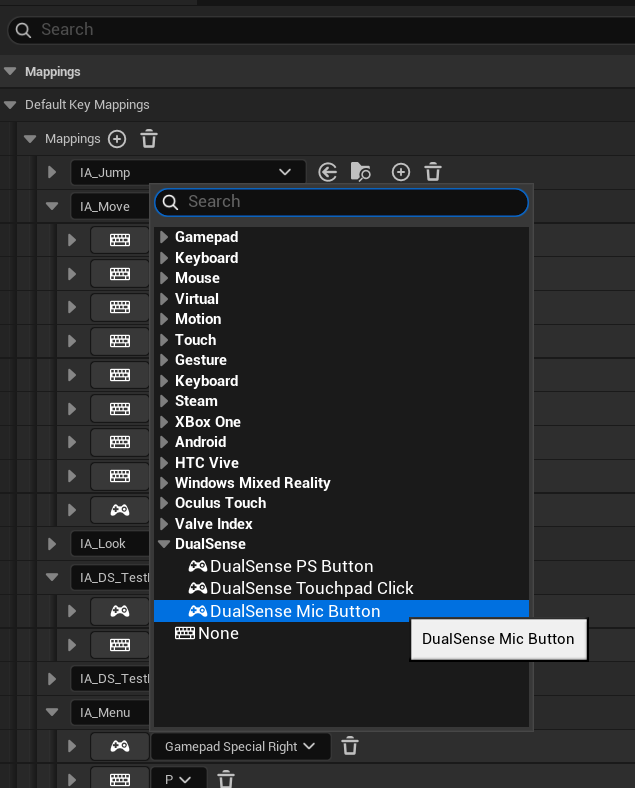
Key list and examples: Input.
3. Turn effects on and off with your gameplay
Give each gameplay moment its own event, set what changes there and finish with DS Update Output. In this example, holding a tool makes R2 resist and click, and the lightbar turns orange. Putting the tool away frees the trigger and the lightbar goes back to blue:
Call OnToolEquipped and OnToolHolstered from wherever your game decides it, for example the input action that switches weapons or the function that attaches the tool to the hand.
Three rules make this predictable:
- The state is kept. Each
DS Set ...node changes only its own part. Setting the lightbar does not touch the triggers, so each event only sets what it is about. - Nothing reaches the controller until DS Update Output. Set several things in a row and send them with one call. If nothing changed, the plugin skips the write, so calling it often is cheap.
- Effects stay on until you change them. A trigger effect or a rumble keeps running until you call DS Stop Trigger, DS Stop Rumble or set something else.
Common moments and the nodes that go with them:
| Gameplay moment | Nodes |
|---|---|
| Equip a weapon, a bow or a tool | DS Make Trigger ... → DS Set Trigger Effect → DS Update Output (all 12 effects) |
| Put it away, open a menu | DS Stop Trigger → DS Update Output |
| Take damage, land, explosion nearby | DS Set Rumble, then DS Stop Rumble after a Delay, or Unreal's Play Force Feedback (Rumble) |
| Health, team or state colour | DS Set Lightbar Color → DS Update Output (Lightbar and LEDs) |
| Player number in local play | DS Set Player LEDs → DS Update Output |
| A sound on the controller | A Sound Submix routed to the controller (Controller speaker) |
| Effects authored as assets | A Force Feedback Effect with trigger resistance, played with Play Force Feedback (Force Feedback assets) |
4. Clean up when the level ends
When the game closes, the plugin frees the triggers and turns rumble and LEDs off by itself. Between levels, and when you stop Play in the editor, the controller keeps the last state you sent. Clear it where your gameplay ends, for example in Event End Play of the component:
DS Reset Controller State → DS Update Output
Reset clears everything at once (lightbar, LEDs, rumble and both triggers). To clear only one thing, use the matching stop node instead.
5. Check that the controller is there
You can call the DS nodes while no controller is connected: the state is kept and sent as soon as one connects, so you don't need to guard every call. Use DS Is Controller Connected (and DS Get Connected Controller Count) when the game itself should react, for example to show a "connect your controller" prompt or to hide controller-only options. More in Multiple controllers.
The same in C++
Every node has a function on the UDualSenseSubsystem game instance subsystem. Add AdaptivePad to the dependencies in your .Build.cs (details), then:
#include "UDualSenseSubsystem.h"

void UPadFeedbackComponent::OnToolEquipped()
{
    if (UDualSenseSubsystem* Pad = GetWorld()->GetGameInstance()->GetSubsystem<UDualSenseSubsystem>())
    {
        Pad->SetTriggerEffect(0, EDSTriggerHand::Right, FDS5TriggerEffect::MakeWeapon(4, 7, 8));
        Pad->SetLightbarColor(0, FLinearColor(1.f, 0.35f, 0.f));
        Pad->UpdateOutput(0);
    }
}

void UPadFeedbackComponent::EndPlay(const EEndPlayReason::Type Reason)
{
    if (UDualSenseSubsystem* Pad = GetWorld()->GetGameInstance()->GetSubsystem<UDualSenseSubsystem>())
    {
        Pad->ResetOutputState(0);
        Pad->UpdateOutput(0);
    }
    Super::EndPlay(Reason);
}
All the functions: C++ API.
Ship it
Nothing to configure for packaging: the plugin is built into your game and players don't install anything, not even a driver. The plugin runs on Windows 64-bit only. If the same project ships on other platforms, keep the controller calls in code that only runs on Windows.
Checklist
- Plugin enabled, controller listed in the Output Log at Play.
- Gamepad keys mapped in your Input Mapping Context.
- Each gameplay moment sets its effect and ends with DS Update Output.
- Every effect you turn on has a place where it is turned off.
- DS Reset Controller State + DS Update Output when the level ends.
- Tested by hand with the controller: the triggers and the rumble can only be felt, not seen.